Battery switch on travel trailer function: Mastering your travel trailer’s electrical system starts with understanding its battery switch. This seemingly simple device plays a crucial role in managing power flow, preventing drain, and keeping your RV running smoothly. We’ll explore different switch types, wiring, troubleshooting, and essential safety tips to keep you powered up on the road.
From single to dual switches, rotary selectors, and beyond, we’ll break down the advantages and disadvantages of each. Learn how these switches control the flow of power between your house batteries and your vehicle’s battery, ensuring optimal performance and preventing costly mistakes. We’ll also cover essential safety measures and provide clear, step-by-step guidance for troubleshooting and maintenance.
Types of Battery Switches in Travel Trailers: Battery Switch On Travel Trailer Function
Choosing the right battery switch for your travel trailer is crucial for managing your power sources efficiently and safely. Different types offer varying levels of control and complexity, each with its own set of advantages and disadvantages. Understanding these differences will help you select the best option for your needs.
Single Battery Switches
A single battery switch is the simplest type, offering a single on/off control for one battery. It’s typically used in trailers with only one battery, usually a 12V deep-cycle battery for powering the trailer’s interior lights, water pump, and other 12V appliances. This type of switch is inexpensive and easy to install.
So, you’re planning a trip? Awesome! First things first: get travel insurance. Seriously, check out Aon travel insurance – they’ve got you covered for pretty much anything. And since you’ll be traveling, don’t forget about your tunes! If you’re an audiophile, setting up your portable system is key. Head over to this audiophile travel setup guide for some tips on making your journey sound amazing.
Happy travels!
Dual Battery Switches
Dual battery switches allow you to control two separate batteries independently. This is common in trailers with both a deep-cycle house battery and a starting battery for the tow vehicle. This setup lets you isolate the house battery to prevent accidental draining by the tow vehicle’s starting system, or vice-versa, protecting your house battery from deep discharge.
Rotary Battery Switches
Rotary switches offer multiple positions, typically allowing you to select between: “Off,” “Battery 1,” “Battery 2,” and “Both.” This provides fine-grained control over your power sources. They are more complex than simple on/off switches but offer greater flexibility. Some high-end rotary switches even include a “combined” setting that allows charging both batteries simultaneously from the alternator or solar panels.
Combination Battery Switches (with Circuit Breaker)
These switches combine the functionality of a rotary switch with an integrated circuit breaker for added safety. This is a popular choice because it provides both the flexibility of a rotary switch and protection against overloads. The circuit breaker automatically cuts the power if there’s a short circuit or excessive current draw, preventing damage to your batteries or wiring.
Comparison Table of Battery Switch Types
| Type | Advantages | Disadvantages | Typical Use Cases |
|---|---|---|---|
| Single Battery Switch | Simple, inexpensive, easy to install. | Limited functionality; only controls one battery. | Travel trailers with a single 12V battery. |
| Dual Battery Switch | Independent control of two batteries; prevents accidental draining. | Less flexible than rotary switches; only two positions (on/off for each battery). | Travel trailers with separate house and starting batteries. |
| Rotary Battery Switch | Multiple positions (Off, Battery 1, Battery 2, Both); allows charging both batteries simultaneously. | More complex to install and understand than simpler switches. | Travel trailers with multiple batteries requiring flexible power management. |
| Combination Battery Switch (with Circuit Breaker) | Offers the flexibility of a rotary switch with added safety from an integrated circuit breaker. | More expensive than simpler switches. | Travel trailers where safety and flexible power management are prioritized. |
Function and Purpose of a Battery Switch
A battery switch in your travel trailer acts as the central control for your electrical system’s power flow. It’s essentially a gatekeeper, allowing you to selectively connect and disconnect your house batteries from the tow vehicle’s battery, and to control which battery bank powers your trailer’s appliances. This is crucial for managing power and preventing issues like unwanted battery drain.The battery switch manages power flow by directing the current from the various battery sources to the different circuits in your travel trailer.
For instance, a common setup involves a switch that allows you to connect your house batteries (used to power the trailer’s lights, fridge, and other appliances) to the tow vehicle’s battery (for charging). It also provides the ability to isolate the house batteries completely to prevent them from draining while the trailer is not in use or to isolate a potentially faulty system.
The switch is typically a multi-position switch, offering options to connect to different battery banks or to disconnect completely.
Battery Switch Usage Scenarios
Proper use of your battery switch is vital for maintaining the health of your batteries and preventing electrical problems. Leaving the house batteries connected to the tow vehicle’s battery indefinitely when the trailer is not being towed could drain the tow vehicle’s battery. Conversely, disconnecting the house batteries when the trailer is connected to shore power (mains electricity) allows the batteries to be charged safely without back-feeding.
Another important scenario is isolating a problematic circuit; if a short circuit is suspected, disconnecting the affected battery bank can prevent further damage. Finally, isolating the batteries entirely when storing the travel trailer for an extended period helps prevent parasitic drain from small electronics, keeping the batteries at a safe charge level.
Wiring Diagrams and Connections
Understanding how to wire your travel trailer’s battery switch is crucial for a safe and functional electrical system. Proper wiring ensures the correct flow of power and protects your equipment from damage. This section will illustrate simple and more complex wiring scenarios, emphasizing the importance of safety features.Wiring diagrams help visualize the electrical pathways in your travel trailer.
They’re essential for troubleshooting and understanding how different components interact. We’ll look at both basic and more advanced setups to give you a clearer picture.
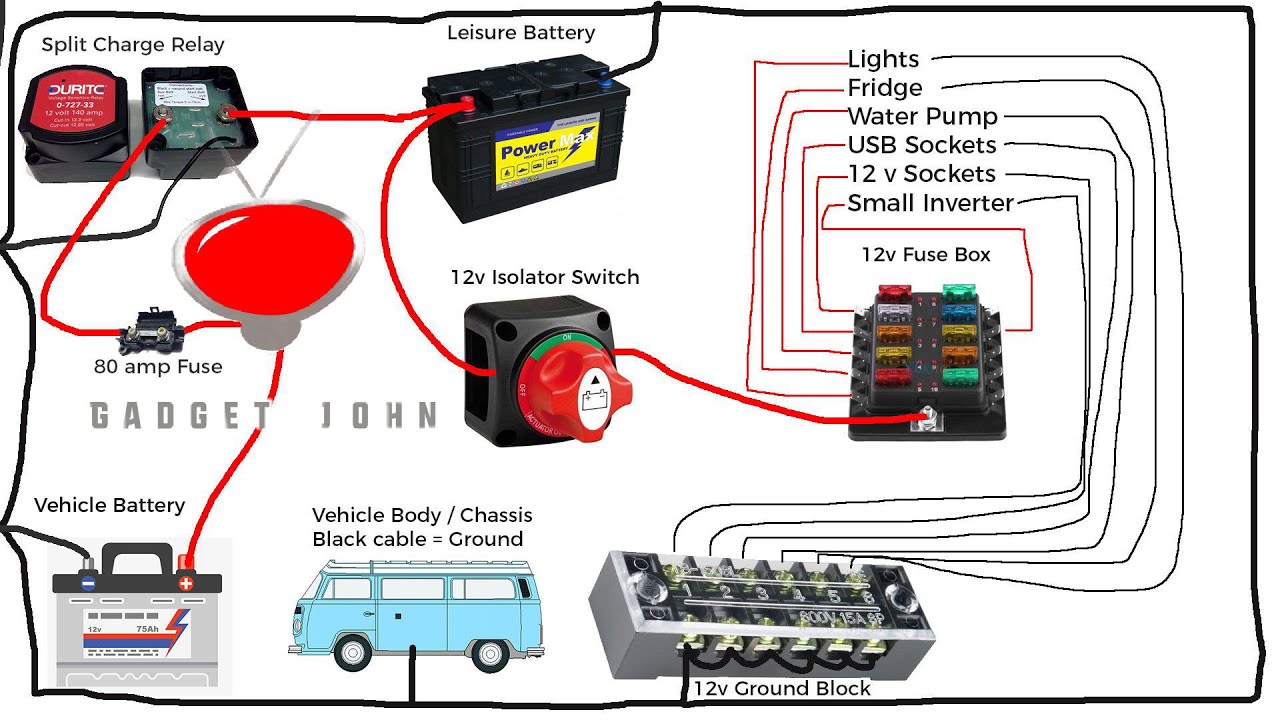
Simple Battery Switch Wiring Diagram
Imagine a basic system with one battery and a single load (like a refrigerator). The positive (+) cable from the battery connects to the input terminal of the battery switch. The output terminal of the switch then connects to a fuse, which is followed by the positive cable leading to the refrigerator. The negative (-) cable from the battery connects directly to the chassis (ground) of the trailer, and the negative cable from the refrigerator also connects to the chassis (ground).
The switch controls the flow of positive current; when the switch is off, the circuit is broken, preventing power from reaching the refrigerator. This simple diagram illustrates the fundamental principles of battery switch operation. The fuse protects the circuit from overloads.
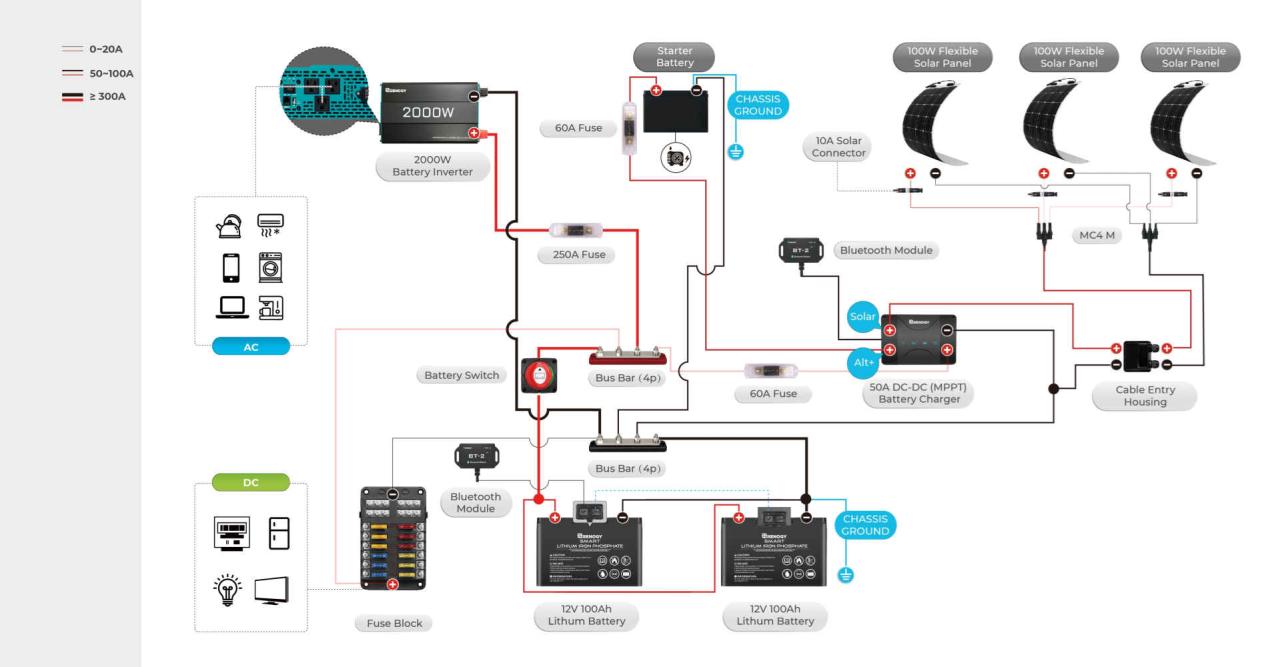
Multiple Batteries and Loads Wiring Diagram, Battery switch on travel trailer function
Now, consider a more complex system with two batteries (a house battery and a starting battery) and multiple loads (refrigerator, lights, water pump). The positive (+) cable from each battery connects to its own input terminal on a dual battery switch. The output terminals of the switch connect to a distribution panel with multiple fuses or circuit breakers protecting individual circuits for different loads (refrigerator, lights, water pump etc.).
Each load has its own fuse/circuit breaker. The negative (-) cables from both batteries connect to the trailer’s chassis (ground), as do the negative cables from each load. This setup allows for independent control of both batteries and protects individual loads from overcurrents. The dual battery switch allows for selection of either battery or both batteries to power the loads.
Fuse and Circuit Breaker Placement and Function
Fuses and circuit breakers are essential safety devices that protect your electrical system from overloads and short circuits. They are designed to interrupt the flow of current if a fault occurs, preventing damage to your equipment and potentially hazardous situations. Fuses are one-time use devices; once blown, they need to be replaced. Circuit breakers, on the other hand, can be reset after an overload.In a typical setup, fuses or circuit breakers are placed in the positive (+) line, after the battery switch and before the loads.
This ensures that if a short circuit or overload occurs in any load, only that circuit will be interrupted, while the rest of the system remains operational. Placement after the switch ensures that the switch can still be used to isolate the power to the entire system if necessary. For example, a fuse might be placed inline between the battery switch output and the positive wire leading to the refrigerator.
A larger circuit breaker might be placed on the main positive line before the distribution panel to protect the entire system. The size of the fuse or circuit breaker should be appropriately matched to the amperage rating of the load and the wiring gauge. Improper sizing can lead to either nuisance tripping or failure to protect the circuit.
Troubleshooting Common Issues
Battery switch problems in your travel trailer can leave you stranded without power. Understanding common issues and how to troubleshoot them is crucial for maintaining your RV’s electrical system. This section Artikels typical problems and provides step-by-step solutions to get you back on the road.
So, you’re planning a trip? Awesome! First things first: get yourself sorted with travel insurance. Check out Aon travel insurance for some solid options; they’ve got a range of plans to suit different needs and budgets. Then, if you’re an audiophile like me, don’t forget your tunes! Seriously consider a proper audiophile travel setup – it’ll make those long journeys way more enjoyable.
Protecting yourself and your ears is key for a smooth trip!
No Power from the Battery Switch
This is the most common issue. Several factors could be at play, from a blown fuse to a faulty switch itself. Before starting any troubleshooting, always disconnect the negative battery cable to prevent accidental shocks.
- Check the fuses: Locate the fuses associated with your battery switch and the circuits you’re having trouble with. Use a visual inspection to see if any fuses are blown (the internal wire will appear broken). Replace any blown fuses with fuses of the same amperage rating.
- Inspect the wiring: Look for any loose connections, corroded terminals, or damaged wiring at the battery switch and along the connecting wires. Tighten loose connections and clean corroded terminals with a wire brush. Replace any damaged wiring sections.
- Test the battery switch itself: Using a multimeter set to the continuity setting (usually represented by a symbol resembling a diode), test the continuity across the switch terminals. If the switch is working correctly, you should get a reading indicating continuity when the switch is in the “on” position and no continuity when it’s “off.” A lack of continuity in the “on” position suggests a faulty switch.
- Verify battery voltage: Use your multimeter to check the voltage of your battery. A low or completely depleted battery will prevent power from flowing even if the switch is functioning correctly. A reading of less than 12.6 volts for a 12-volt battery indicates it needs charging.
Intermittent Power from the Battery Switch
This points to a less obvious problem, often related to loose connections or a failing switch.
- Check for loose connections: Vibration from travel can loosen connections over time. Carefully inspect all connections at the battery switch and along the wiring harness. Tighten any loose screws or terminals.
- Inspect the switch for damage: Look for signs of corrosion, burning, or physical damage to the switch itself. A failing switch may exhibit intermittent behavior as internal components degrade.
- Test the switch for continuity (as above): While the switch might show continuity in the “on” position, intermittent operation suggests an internal problem preventing consistent connection.
- Check for corrosion: Corrosion can cause intermittent connection issues. Clean all battery terminals and connections with a wire brush and baking soda solution to remove any corrosion build-up.
Overheating Battery Switch
An overheating switch is a serious issue that indicates a high current draw or a short circuit.
- Immediately disconnect the battery: This is crucial to prevent fire or damage to the switch or wiring. Do not attempt to troubleshoot while the switch is overheating.
- Inspect for short circuits: Carefully examine the wiring connected to the switch for any signs of bare wires touching or shorts to the chassis. Repair any shorts immediately.
- Check for excessive current draw: A high current draw (e.g., from a faulty appliance or incorrect wiring) can overheat the switch. Check all appliances connected to the system to make sure they’re functioning correctly and not drawing excessive current.
- Replace the switch: An overheating switch is likely damaged and should be replaced with a switch of appropriate amperage rating.
Multimeter Testing and Interpretation
A multimeter is essential for testing the battery switch. Set the multimeter to the continuity test setting. Touch the probes to the input and output terminals of the switch. A continuous beep or a low resistance reading (close to zero ohms) indicates a good connection. No beep or a high resistance reading indicates a break in the circuit.
Repeat this test with the switch in both the “on” and “off” positions. Always remember to disconnect the negative battery cable before performing any electrical tests.
Battery Switch Maintenance and Replacement
Keeping your travel trailer’s battery switch in good working order is crucial for reliable power. Regular maintenance prevents problems and extends the lifespan of the switch, saving you potential headaches and repair costs down the road. Neglecting maintenance can lead to corrosion, poor connections, and ultimately, switch failure.Regular maintenance involves a simple cleaning and inspection routine, while replacement is a straightforward process if you encounter a faulty switch.
This section details both procedures.
Battery Switch Maintenance Schedule
A simple, regular inspection and cleaning schedule can significantly extend the life of your battery switch. Ideally, this should be part of your overall pre-trip and seasonal maintenance routines for your RV.
- Monthly Inspection: Visually inspect the switch for any signs of corrosion, loose connections, or damage to the wiring. Look for any discoloration or buildup around the terminals.
- Semi-Annual Cleaning: Use a wire brush or sandpaper to carefully clean any corrosion from the terminals and the switch housing. Apply a dielectric grease to the terminals after cleaning to prevent future corrosion.
- Annual Thorough Inspection: Perform a more thorough inspection, checking all wiring connections for tightness and ensuring there are no frayed wires or loose connections. Test the switch functionality to ensure it’s working correctly.
Battery Switch Replacement Procedure
Replacing a faulty battery switch is a relatively simple task, but it’s crucial to disconnect the battery before beginning any work to avoid electrical shock.
- Disconnect the Battery: Disconnect both the positive (+) and negative (-) terminals from the battery. This is the most important safety step.
- Identify the Switch: Locate your battery switch. It’s typically near the batteries, often mounted on a panel or directly to the frame.
- Remove the Old Switch: Disconnect all wires connected to the switch. Take photos or make notes of the wire connections to aid in reassembly. Use the appropriate tools to remove the switch from its mounting location. This might involve removing screws or bolts.
- Select a Replacement Switch: Choose a replacement switch with the same amperage rating as the original. Consider factors such as size, mounting style, and any additional features you might want (e.g., a switch with a built-in voltmeter).
- Install the New Switch: Mount the new switch in the same location as the old one. Reconnect the wires, carefully matching them to the connections you noted earlier. Double-check all connections before proceeding.
- Reconnect the Battery: Reconnect the positive (+) and negative (-) battery terminals.
- Test the Switch: Turn the switch on and off to ensure it’s functioning correctly. Check your battery voltage to confirm power is flowing correctly to your appliances.
Tools and Materials for Battery Switch Replacement
Having the right tools and materials readily available will make the replacement process smoother and safer.
- Wrench or Socket Set: To disconnect the battery terminals and remove the switch.
- Screwdriver (Phillips and Flathead): Depending on the switch mounting.
- Wire Brush or Sandpaper: For cleaning corroded terminals.
- Dielectric Grease: To prevent corrosion on the terminals.
- Replacement Battery Switch: Ensure it’s the correct amperage and type.
- Wire Strippers/Cutters (Optional): If you need to cut or strip any wires.
- Multimeter (Optional): To test the switch functionality.
Understanding your travel trailer’s battery switch is key to preventing electrical headaches and ensuring a smooth, enjoyable RV experience. By learning the different types of switches, their functions, and how to troubleshoot common issues, you’ll be empowered to maintain your RV’s electrical system and avoid costly repairs. Remember safety first – always disconnect the battery before working with the electrical system.
Happy travels!
Key Questions Answered
How often should I clean my battery switch?
Inspect and clean your battery switch at least once a year, or more frequently in dusty or humid environments. Use a wire brush and degreaser to remove corrosion.
What size fuse should I use with my battery switch?
The appropriate fuse size depends on the amperage rating of your battery switch and the wiring. Consult your switch’s specifications and follow the manufacturer’s recommendations. Never use a fuse with a higher amperage rating than specified.
Can I use a battery switch from a different RV model?
While possible, it’s generally not recommended. Ensure the replacement switch has the correct amperage rating, voltage, and terminal configuration for your specific system to avoid damage.
My battery switch is making clicking noises. What’s wrong?
Clicking noises often indicate a problem with the switch itself or a loose connection. Check for corrosion, loose wires, or a faulty switch. If the problem persists, replace the switch.
